
Headless on Umbraco .NET Core Part 3: Setup GraphQL API and Connect Back-end and Front-end
Welcome to the third part of our series on "How To Setup An Umbraco .NET Core Headless CMS Using Gridsome and Vue.js With Automated Deployment"!
Now we tie the Umbraco Back-end to the Gridsome Front-end and make the entire process work from end to end. This includes setting up the Vue.js rendering of Umbraco content and auto-deploying content changes from Umbraco to Azure.
Download Required Files
This step uses a few files that need to be added to your project. Rather than try to inline the source in the article, we've bundled them as a ZIP file here. Please download this ZIP file, extract it locally, and then integrate the files as instructed below.
Click Here to Download the Required Files ZIP
Content Management Setup
You now have a working front-end and a working back-end. You also have a media library in Azure. The next step is to make sure there are triggers in place to keep these things in sync. We haven't actually made the front-end use any content from the back-end yet, but once we do we'll want to make sure the front-end rebuilds any time there is a content change. Additionally, since the .NET Core Alpha doesn't have the regular UmbracoFileSystemProviders.Azure.Media package, we'll need to wire up a trigger to copy any media changes into our Blob storage.
Add Frontend Build Trigger
- Copy the Backend/UnicoreDemo/FrontEnd.cs file from the Required Files ZIP to your back-end project. This code triggers the front-end AppVeyor build anytime there is a change in the published content. It uses configuration settings that we'll setup below when we publish it.
- Add the following code at the end of the ConfigureServices method in the Startup class
services.AddHostedService();
Add Media Update Trigger
- Add a reference to the Azure.Storage.Blobs NuGet package using the following command:
dotnet add package Azure.Storage.Blobs
- Copy the Backend/UnicoreDemo/MediaUpdate.cs file from the Required Files ZIP to your back-end project. This code uploads media images to your Blob storage, using configuration settings we'll setup below in the Publish section. This is needed only because the UmbracoFileSystemProviders.Azure.Media package isn't available for the Umbraco .NET Core alpha at the time of writing.
- Add the following code to the end of the ConfigureServices method in the Startup class
services.AddHostedService<MediaUpdate>();
Create Document Type in Backend
- Log into the Umbraco Back-office of your web app
- Go to the Settings section
- Right-click on "Document Types" on the left, and choose "Create...", then "Document Type"
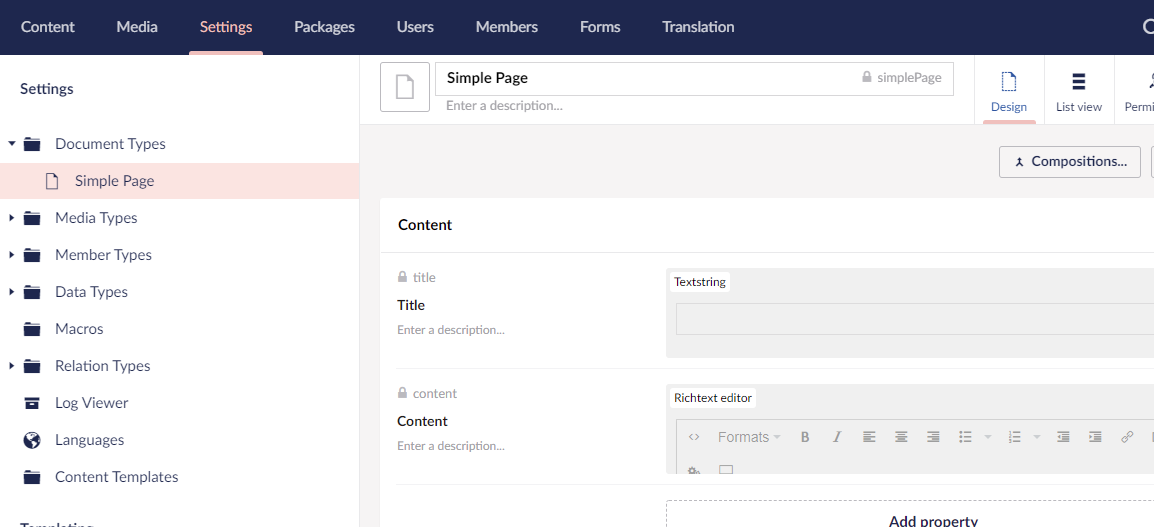
- Give it a name of Simple Page, and make sure the alias is simplePage
- Add a group called Content
- Add a property called Title with an editor of "Textstring"
- Add a property called Content with an editor of "Richtext editor"
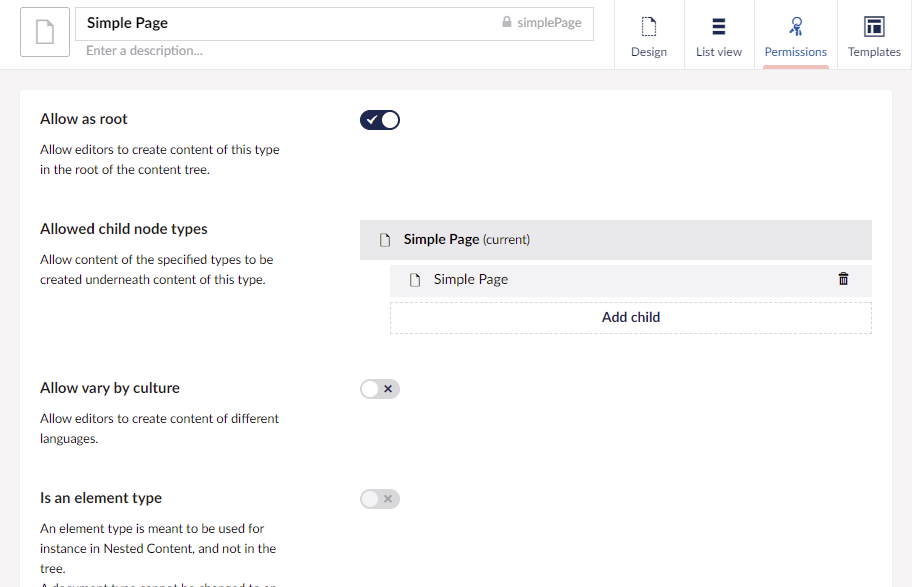
- Click on the Permissions tab in the upper-right
- Enable the "Allow as root" option
- Click on "Add child", and choose the "Simple Page" so that we can nest these pages
- Click "Save" in the lower-right
Publish and Review
With the site up and running locally now, you can publish it up to Azure and see your back-office working there.
- Open a command prompt in the UnicoreDemo directory, and execute this command:
dotnet publish -o dist
- In the Azure Portal for your web app, on the Overview page, click Stop at the top to stop the web app
- Open an FTPS client, such as FileZilla, and connect to the FTPS server from the Azure Web App deployment center (See Part 2 of this Series - "Create AppService on Linux", Step 17)
- Upload any changed files (should be just the UnicoreDemo.* files and the web.config file)
- In Azure, start the web app
- Get your AppVeyor API key from the API keys page under User settings
- In the Azure Portal, go to the Configuration page for your web app
- Add the following "Application Settings" entries:
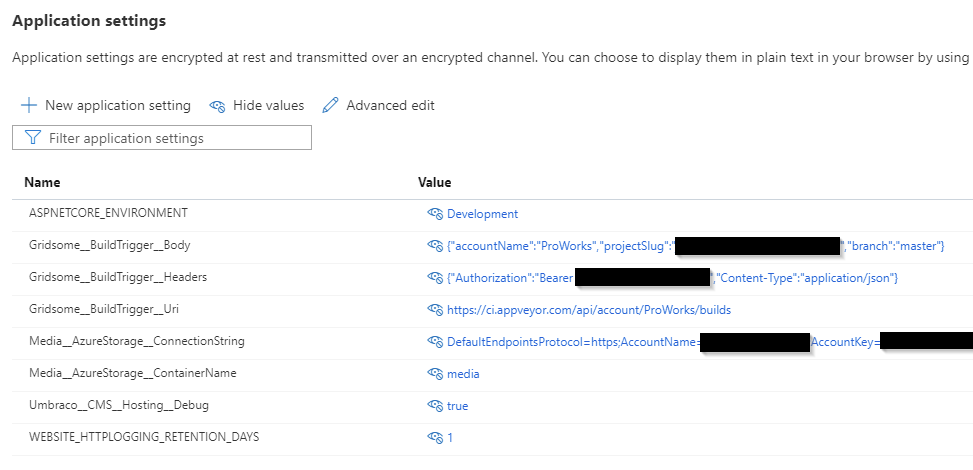
- Gridsome__BuildTrigger__Headers = {"Authorization":"Bearer {api-token}","Content-Type":"application/json"}
Replace {api-token} with the token you got in step 1 above - Gridsome__BuildTrigger__Body = {"accountName":"{account-name}","projectSlug":"{project-slug}","branch":"master"}
Replace {account-name} with the AppVeyor account name, and {project-slug} with the project slug value. You can find both these values by going to the main page for your Frontend project in AppVeyor. The URL will be something like https://ci.appveyor.com/project/ProWorks/unicoregridsomefrontend, in which case ProWorks is the account name and unicoregridsomefrontend is the project slug. - Gridsome__BuildTrigger__Uri = https://ci.appveyor.com/api/account/{account-name}/builds
Replace {account-name} with the AppVeyor account name - Media__AzureStorage__ConnectionString = {connection-string}
Replace {connection-string} with the connection string from your Azure storage account, noted in step 8 of "Create BLOB Containers" in Part 1 - Media__AzureStorage__ContainerName = media
- Gridsome__BuildTrigger__Headers = {"Authorization":"Bearer {api-token}","Content-Type":"application/json"}
- Click "Save" once all the entries are added
- Give it a few seconds to restart, then log in to the Umbraco back-office (NOTE: If you have odd errors on trying to access the back-office, try FTPing all the files from your local machine instead of just the recently changed ones)
- In the Content section, add a single top-level home page
- Add a few pages beneath that, using some images on some or all of the pages
- After you have Saved and Published the changes, log into AppVeyor, and verify that your front-end build has started

Integrate Front and Back
Create Data Controller in Backend
Copy the Backend/UnicoreDemo/DataController.cs file from the Required Files ZIP to your back-end project. This code exposes an endpoint for getting raw data out of the project. Normally, we would use the Umbraco GraphQL Package for something like this, but the package isn't available for the Umbraco .NET Core Alpha yet.
Publish and Review Backend
- Open a command prompt in the UnicoreDemo directory, and execute this command:
dotnet publish -o dist
- In the Azure Portal for your web app, on the Overview page, click Stop at the top to stop the web app
- Open an FTPS client, such as FileZilla, and connect to the FTPS server from the Azure Web App deployment center above
- Upload any changed files (should be just the UnicoreDemo.* files and the web.config file)
- In Azure, start the web app
- Navigate to /api/data/content on the Backend URL and verify that you are getting JSON data showing each of your content nodes
Read Data Controller into Frontend
Gridsome uses a GraphQL data store to provide data from many external sources to the page building process. All pages are built into static HTML with pre-loading and SPA navigation. To integrate the front-end and back-end, we will need to pull data from our newly created data controller into this GraphQL data store so that it is available to our pages when being built.
We also want out site structure to be built from the structure of content in Umbraco. Gridsome allows us to easily do this with their Pages API. Once we have the data in the GraphQL data store, we can query that data and dynamically create the page structure for the site.
References: https://gridsome.org/docs/fetching-data/ - https://gridsome.org/docs/data-store-api/ - https://gridsome.org/docs/pages-api/
- Open a command prompt in the front-end directory
- Run the following command to install the Axios tool that we will use to retrieve data
npm install axios
- Copy the Frontend/gridsome.server.js file from the Required Files ZIP to your Frontend folder. Replace the {AzureWebAppName} token in the script with the name of your Azure web app. This file reads from the data controller and populates Gridsome's GraphQL database with content from your Umbraco site. It also then reads from that database to generate the menu structure, and create the pages of your site. See the comments inline for details on what each section is doing.
Use Data on Page
To actually use the data on our pages, we'll need to replace a few default Gridsome pages, and add our custom template.
- Delete all files under src/pages
- Create a .env file in the root directory with this content, so that we can have a single place for media references. Replace the {AzureStorageAccountName} token in the file below with the name of your Azure storage account
GRIDSOME_MEDIA_BASE=https://{AzureStorageAccountName}.blob.core.windows.net - Copy the FrontEnd/src/templates/SimplePage.vue file from the Required Files ZIP to your Frontend folder. This template will be used for all Umbraco pages that have the SimplePage template set on the content node.
- Replace the FrontEnd/src/layouts/Default.vue file with the one in the Required Files ZIP. This will add a navigation header to each page.
Publish and Review Frontend
- Commit and push your front-end code change, and wait for the build to finish
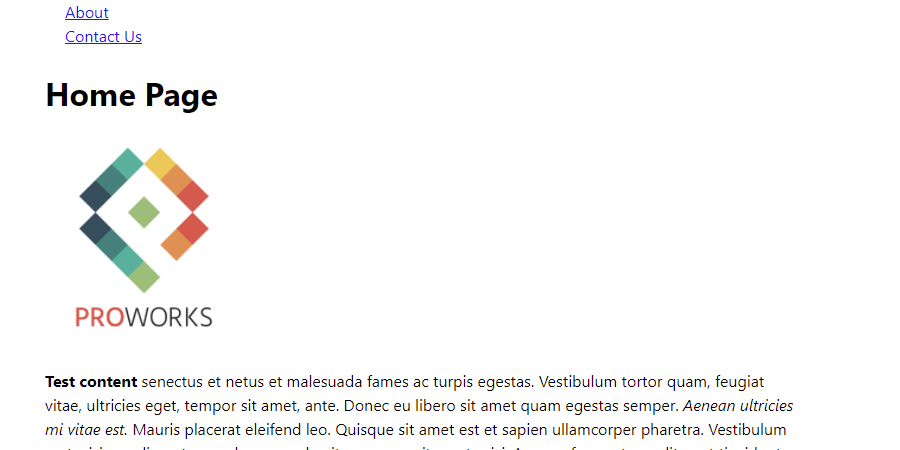
- Navigate to the front-end web site and you should now see your pages with their content displayed
- Make a change in the Umbraco back-end and verify that it triggers a build of your front-end
- Once this front-end build completes, refresh the front-end of your site to verify that the updated content is displayed
Now we have a fully working and hosted Headless Umbraco CMS using .Net Core! Now you can build out your content structure in Umbraco and add the rendering to Vue.js templates like you would Razor templates.
Next up will be:
Headless on Umbraco .NET Core Part 4: Setup Site Search Using A Cloud Service
Let us know if you have any questions or issues in the comments below!