
Building with Claude and Umbraco: Setting Up MCP and Creating Content with AI
I'll be honest, when Jason first mentioned setting up an MCP server to connect Claude to our Umbraco dev environment, I assumed it was going to be a difficult dev-heavy project that would take the day at least, and be a bit past my coding comprehension ability as a Front End Developer. I even made a new local branch assuming I was going to have to write and commit code.
Nope! It wasn't like that at all. And I'm still a little surprised about it. It was just setting up a config file in Claude and setting up API users in Umbraco.
If you're an Umbraco developer who's been curious about AI-assisted content workflows but figured the setup overhead wasn't worth it, this post is for you. I'm going to walk through exactly what I did, what tripped me up (spoiler: one small thing), and what became possible on the other side of it.
Part 1: What Is the Umbraco MCP Server, Anyway?
MCP stands for Model Context Protocol. It's an open standard that lets AI assistants like Claude connect directly to external tools and services, not just chat about them, but actually interact with them.
The Umbraco MCP server is an implementation of that standard for Umbraco. Once it's set up and connected, Claude can read and write content in your Umbraco instance through the Management API. We're talking creating pages, updating properties, working with block components, the same things you'd do in the back office, but driven by Claude. It's actually pretty amazing to see it work.
Part 2: Setting Up the MCP Server
Before anything else, a quick note on prerequisites. You'll need an Umbraco site to connect to (we're using our dev environment), and Claude Desktop or Cowork installed on your machine. That's really it on the "before you start" front, which was the first pleasant surprise.
The MCP server itself is configured through a JSON config file in Claude. Go to your Claude settings, then Developer, and click the "Edit Config" button to bring up the claude_desktop_config.json file in your favorite editor.
Note: Close Claude completely (including killing it in the taskbar) while working on the config file. If Claude is running, it will overwrite your changes when it closes.
Note: Make sure you're on the latest version of Node before you start.
Drop this into your config file, change the name as you like, change the BASE_URL to your site, and we'll cover the CLIENT_ID and SECRET in the next steps.
"mcpServers": {
  "YOUR-umbraco-dev-mcp-server": {
    "command": "npx",
    "args": [
      "@umbraco-cms/mcp-dev@latest"
    ],
    "env": {
      "UMBRACO_CLIENT_ID": "umbraco-back-office-api-user",
      "UMBRACO_CLIENT_SECRET": "12345-GUID-OR-PASSWORD-6789",
      "UMBRACO_BASE_URL": "https://your-site.io",
      "UMBRACO_INCLUDE_TOOL_COLLECTIONS": "document,media,document-type,data-type"
    }
  }
}
Part 3: Creating an API User in the Umbraco Back Office
This is the part I was most nervous about. "API user" sounds like something that involves a terminal and a lot of Googling. It does not. It's just a few clicks in the Umbraco back office and I was genuinely a little embarrassed by how straightforward it was.
Head into your Umbraco back office and navigate to the Users section. We're going to create both a new User Group and a new API user. First, the User Group. Create one and call it MCP-User-Developer and give it as much control as a developer would. If you ever wanted another group called MCP-User-Editor with less control, you can do that too. For now, add Content, Media and Settings sections and turn on everything you'd like it to have access to.
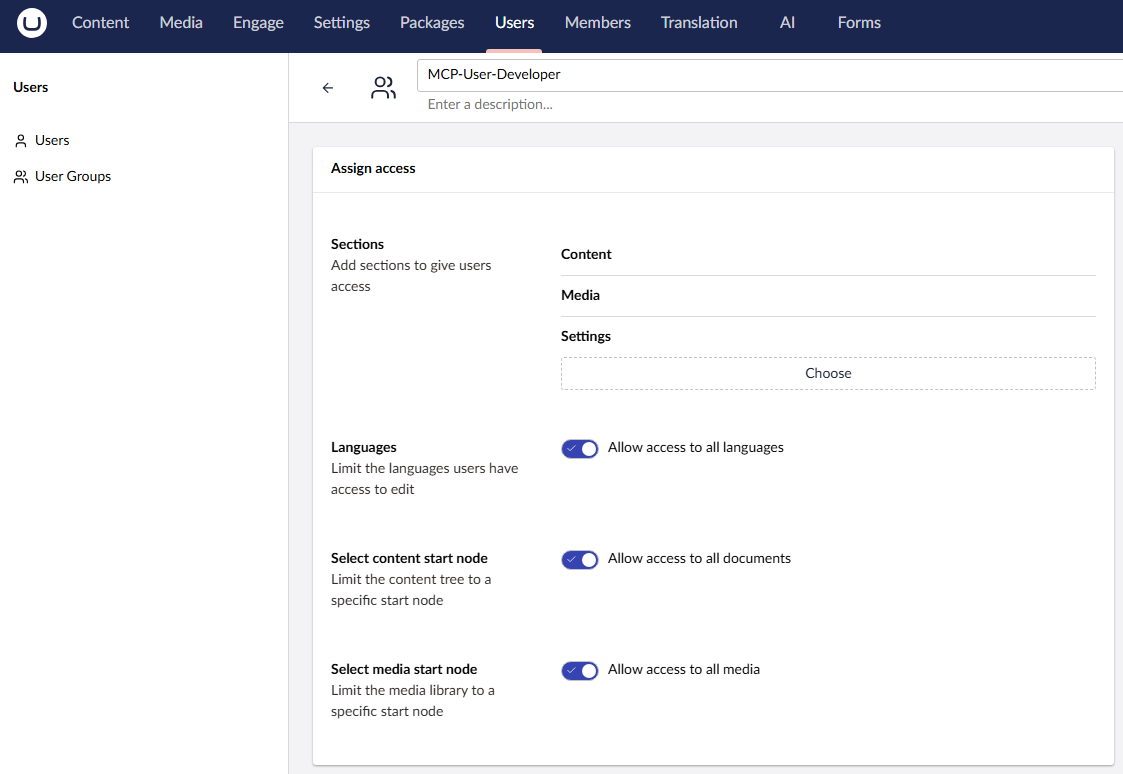
Next, go to Users and create a new API User. Name it something like "something-mcp-developer" and make it a member of the MCP-User-Developer group we just made. Add an email address for its username and check on access to start nodes (or give it full access).
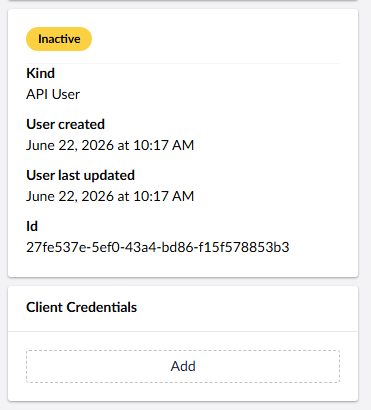
Now the key step: click the Client Credentials button to add the key we'll need in the Claude config file. The ID will have a prefix of "umbraco-back-office" and then you name it whatever you want. In my example I went with "api-user", so the full ID becomes "umbraco-back-office-api-user". For the Secret, generate a GUID or secure password however you like.
Note: Once you click Create, the password won't be visible again. Save it somewhere before moving on!
Now we have all the info for the config file. Go back and add "umbraco-back-office-api-user" to the UMBRACO_CLIENT_ID and your password to the UMBRACO_CLIENT_SECRET.
Part 4: Connecting Claude to Your Umbraco Site
At this point you've got the config file set up and your API user created. The last step is getting Claude to actually recognize the connection. Save your claude_desktop_config.json file and restart Claude. Go to Settings, then Developer again, and you should see your MCP server listed there and running.
I was stuck here for a bit because I was not on the latest version of Node, and also because I had the UMBRACO_CLIENT_ID wrong. Woops! So make sure your config has all the correct info. But if everything checks out you should see a "running" label next to your server, and you're now connected!
A quick way to confirm everything is working is to just ask Claude something simple about your site. Something like "list the pages under the home node" or "what document types are available?" If Claude comes back with real data from your Umbraco instance, you're in business. As soon as it gave me the ID of the home node of our dev site, I knew things were about to get real.
Part 5: Creating Content with Claude
This is the fun part.
Once Claude is connected to your Umbraco instance, you can start asking it to do real content work. Not just drafting copy in the chat window, but actually creating and populating pages inside Umbraco. I started simple, asking Claude to create a Basic Page under the home node with a title and some body text. It did it. First try. I went and checked the back office and there it was, sitting as a draft, ready to review.
From there I started pushing it further. Our Basic Page document type has a bunch of block components available, things like Feature Boxes, Statistics, Testimonials, FAQ sections, Numbered Steps, and a Two-Column Comparison block. I described what I wanted the page to be about and asked Claude to use as many relevant components as made sense for the content. The results were genuinely impressive, well-structured pages with appropriate blocks chosen for the content, not just a wall of rich text.
A few tips from what I've learned so far:
- Give Claude context about your document types. The more it knows about your block components and what fields they have, the better the output.
- Keep pages as drafts first. Claude creates content as drafts by default, which is exactly what you want. Review before publishing.
- Be specific about tone and content. Claude will make reasonable choices on its own, but the more direction you give it, the closer the first draft will be to what you actually want.
- Watch out for placeholder content. Claude may generate fictional quotes or statistics as placeholders. Always review before anything goes live.
One small thing to be aware of: on our setup, pages created via the MCP server sometimes needed the template set manually in the back office before they'd render on the front end. It's a quick fix, just one more thing to check on your first run through.
Part 6: Real-World Use Cases
So what's this actually good for in practice? After spending some time with it, here are the use cases that have stood out most.
Spinning up draft pages quickly. If you've got a list of pages that need to exist, Claude can create and populate them fast. What might take an editor an afternoon of copying, pasting and formatting can happen in minutes. The drafts still need a human review pass, but you're starting from something solid rather than a blank page.
Consistent page structure across a site. When Claude is working from the same document type and block components every time, the output is naturally consistent. Every page gets a hero, a logical block order, appropriate use of the available components. It's a lot harder to end up with that one orphaned page that's formatted completely differently from everything else.
Exploring content strategy. This one surprised me. Being able to say "create a page making the case for upgrading Umbraco and use whichever block components make sense" and get back a fully structured draft is genuinely useful for figuring out what you actually want to say. It's a fast way to go from a topic to a first draft you can react to.
Auditing and rewriting existing content. Claude can read your existing pages too, which means you can ask it to review copy, flag inconsistencies, or suggest rewrites across multiple pages without touching the back office yourself.
Like I said, I knew things were about to get real.
We're still figuring out the best workflows ourselves at ProWorks, but it's already changing how we think about content production. I'm excited to see where it goes from here.
If you have questions or want to share what you've built with it, feel free to reach out.
Alan Ballard, Front End Developer, ProWorks