Umbraco Training Day 2
The second day of my level 1 Umbraco training. Check out my first day of training in case you missed it. Today we covered ContentPlaceHolders, Recursive values, Content Channels, Nofication Settings, Media, Alternate Templates and Useful Packages.
ContentPlaceHolders
When creating templates you can add ContentPlaceHolders. ContentPlaceHolders are used in inheritance. If you have a Master template you can add a ContentPlaceHolder and then link it to the templates below. To do this in the Parent Template you will have a tag like this
<asp:ContentPlaceHolder Id="MasterContentPlaceHolder" runat="server">
<!-- Insert default "MasterContentPlaceHolder" markup here -->
</asp:ContentPlaceHolder>
and then in any template below the parent which you would like to place content there you will add the tag
<asp:Content ContentPlaceHolderID="MasterContentPlaceHolder" runat="server">
</asp:Content>
The thing that links the placeholder and content tags together is the ContentPlaceHolderID. Another helpful thing about ContentPlaceHolder is that you are able to add default content. This means if there happens to be a page where you don't want to fill out the content for the placeholder it will just use what you placed between the <asp:ContentPlaceHolder> </asp:ContentPlaceHolder>.
You are also able to place <asp:ContentPlaceHolder> </asp:ContentPlaceHolder> inside <asp:Content> </asp:Content> tags. That would look like this
<asp:Content ContentPlaceHolderID="MasterContentPlaceHolder" runat="server">
<asp:ContentPlaceHolder Id="SubMasterContentPlaceHolder" runat="server">
<!-- Insert default "SubMasterContentPlaceHolder" markup here -->
</asp:ContentPlaceHolder>
</asp:Content>
ContentPlaceHolders are great for improving the performance of your site. They allow for the rendering of the code that needs to be rendered only. Another benefit is taking advantage of the inheritance, which allows you to write less code.
Recursive Values
Umbraco is XML, all of it. Each node in the XML represents a content page. This allows for the nesting of your content nodes. Since we have this format of XML nesting we can use recursion to walk up the content tree until it finds what its looking for.
This can be leveraged for items that need to appear on every page, but you don't want to have to throw the HTML on each template you have or each content item that you have.
This means you can set a property that every page has on the root node and use the recursive feature to have each <umbraco:Item> walk up the content tree until it finds the first occurence which is the one you want.
Another way to use this is if there are only certain occurences where you will want to change the property, but every other time you want it to be a default value. With the recursion you can set it on the content which doesn't have a default value and the recursion will stop at that content node and display the correct value. Every other content node that doesn't have a set value will display the default value.
Content Channels
Content channels are used for content editing. They allow you to use third party applications such as Microsoft Word or Microsoft Live for example to edit Umbraco Content. These allow for you to have all of the features of spell checking, creating and inserting graphics, and or editing Umbraco content while offline.
A problem with Content Channels is that you are only able to edit three of the fields that a single document type has. An example is the Movies. You would only be able to edit the Description of the movie, the date released and the actors of the movie. Every other property on the Movie Document Type would be left blank.
Nofication Settings
There are several features in Umbraco which are set by default. A great example is how English is always the UK english. That is why your dates are set as 12/09/2012 instead of 09/12/2012. Well you can change this by going to your Websites directory and then going to umbraco\config\lang. The en xml document is the langauge document for english. If you changed the line
<language alias="en" intName="English (uk)" localName="English" lcid="" culture="en-GB">
to
<language alias="en" intName="English (us)" localName="English" lcid="1033" culture="en-US">
your values dates will change as well as other things.
In the same file you also can change the default message for autogenerated emails sent by Umbraco. Look for the key <key alias="mailBodyHtml" version="3.0"> and this is where you would change it to something more appealing to you.
Disclaimer: You are editing a file that Umbraco relies on so you shouldn't do this unless you are absolutly sure you know what your doing. If you choose to do so I am not responsible for breaking your installation!
Media
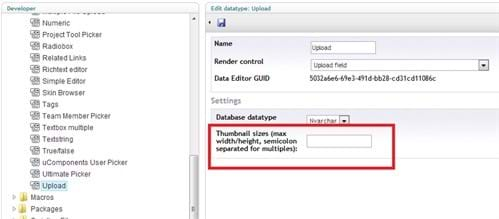
When uploading umbraco media images in the media folder you will get a full sized image which you uploaded and you will also get a thumbnail of default size. You can change the sizes of the thumbnails which are created by going to the developers tab, expanding the Data Types folder and then selecting Upload change the field Thumbnail Sizes and thumbnails will be created of the specified size.
Alternate Templates
Alternate Templates are a way which you can render a content place using a different template than the template which it is configured to use. There are two ways which to reference an alternate template. Both ways will produce the exact same results, but the look different. The first way is to add to the query parameters ?altTemplates=-Name_Of_Alt_Template-. The second way is to add /-Name_Of_Alt_Template at the end of the url.
Since you can add this to any page you need to be careful about which sites can be rendered or not. If you have a piece of content which is data only then you may be able to add alt template to the end of a template and find a bug in your page! This means you need to be careful and make sure sites you don't want rendered can't be rendered.
Useful Tools
Two of the packages which we used during the training were some of the coolest tools I have seen for Umbraco. The first tool is called Contour. Contour is a tool which will allow for the simple creation of forms. You can implement a Contact Us form in a few clicks. You can make your own forms for whatever feature you need user input for.
The second tool which we used was XSLTSearch. This is a search for your website. It is easy to implement and adds a feature which looks extremely impressive.
This was it for the second day. In two days I managed to create an entire website featuring an search feature which will search my entire website for whatever the user wants. A really sweet slider bar was implemented via Razor Macro for the front end to scroll through items which were entered into the content page. Top and Side Naviagation bars which will dynamically display your content. All of this was really easy to implement and its all thanks to Umbraco.
If you are on the fence about a CMS then I would really recommend Umbraco. Better yet, Hire Proworks and we will use Umbraco for you!